AlertDialog的构造方法全部是Protected的,所以不能直接通过new一个AlertDialog来创建出一个AlertDialog。要创建一个AlertDialog,就要用到AlertDialog.Builder中的create()方法。使用AlertDialog.Builder创建对话框需要了解以下几个方法:setTitle :为对话框设置标题setIcon :为对话框设置图标setMessage:为对话框设置内容setView : 给对话框设置自定义样式setItems :设置对话框要显示的一个list,一般用于显示几个命令时setMultiChoiceItems :用来设置对话框显示一系列的复选框setNeutralButton :普通按钮setPositiveButton :给对话框添加"Yes"按钮setNegativeButton :对话框添加"No"按钮create : 创建对话框show :显示对话框一、简单的AlertDialog下面,创建一个简单的ALertDialog并显示它:[java] package com.tianjf;import android.app.Activity;import android.app.AlertDialog;import android.app.Dialog;import android.os.Bundle;public class Dialog_AlertDialogDemoActivity extends Activity { /** Called when the activity is first created. */ @Override public void onCreate(Bundle savedInstanceState) { super.onCreate(savedInstanceState); setContentView(R.layout.main); Dialog alertDialog = new AlertDialog.Builder(this). setTitle("对话框的标题"). setMessage("对话框的内容"). setIcon(R.drawable.ic_launcher). create(); alertDialog.show(); }}package com.tianjf;import android.app.Activity;import android.app.AlertDialog;import android.app.Dialog;import android.os.Bundle;public class Dialog_AlertDialogDemoActivity extends Activity {/** Called when the activity is first created. */@Overridepublic void onCreate(Bundle savedInstanceState) {super.onCreate(savedInstanceState);setContentView(R.layout.main);Dialog alertDialog = new AlertDialog.Builder(this).setTitle("对话框的标题").setMessage("对话框的内容").setIcon(R.drawable.ic_launcher).create();alertDialog.show();}}运行结果如下: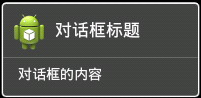 二、带按钮的AlertDialog上面的例子很简单,下面我们在这个AlertDialog上面加几个Button,实现删除操作的提示对话框[java] package com.tianjf;import android.app.Activity;import android.app.AlertDialog;import android.app.Dialog;import android.content.DialogInterface;import android.os.Bundle;public class Dialog_AlertDialogDemoActivity extends Activity { /** Called when the activity is first created. */ @Override public void onCreate(Bundle savedInstanceState) { super.onCreate(savedInstanceState); setContentView(R.layout.main); Dialog alertDialog = new AlertDialog.Builder(this). setTitle("确定删除?"). setMessage("您确定删除该条信息吗?"). setIcon(R.drawable.ic_launcher). setPositiveButton("确定", new DialogInterface.OnClickListener() { @Override public void onClick(DialogInterface dialog, int which) { // TODO Auto-generated method stub } }). setNegativeButton("取消", new DialogInterface.OnClickListener() { @Override public void onClick(DialogInterface dialog, int which) { // TODO Auto-generated method stub } }). setNeutralButton("查看详情", new DialogInterface.OnClickListener() { @Override public void onClick(DialogInterface dialog, int which) { // TODO Auto-generated method stub } }). create(); alertDialog.show(); }}package com.tianjf;import android.app.Activity;import android.app.AlertDialog;import android.app.Dialog;import android.content.DialogInterface;import android.os.Bundle;public class Dialog_AlertDialogDemoActivity extends Activity {/** Called when the activity is first created. */@Overridepublic void onCreate(Bundle savedInstanceState) {super.onCreate(savedInstanceState);setContentView(R.layout.main);Dialog alertDialog = new AlertDialog.Builder(this).setTitle("确定删除?").setMessage("您确定删除该条信息吗?").setIcon(R.drawable.ic_launcher).setPositiveButton("确定", new DialogInterface.OnClickListener() {@Overridepublic void onClick(DialogInterface dialog, int which) {// TODO Auto-generated method stub}}).setNegativeButton("取消", new DialogInterface.OnClickListener() {@Overridepublic void onClick(DialogInterface dialog, int which) {// TODO Auto-generated method stub}}).setNeutralButton("查看详情", new DialogInterface.OnClickListener() {@Overridepublic void onClick(DialogInterface dialog, int which) {// TODO Auto-generated method stub}}).create();alertDialog.show();}}在这个例子中,我们定义了三个按钮,分别是"Yes"按钮,"No"按钮以及一个普通按钮,每个按钮都有onClick事件,TODO的地方可以放点了按钮之后想要做的一些处理看一下运行结果:
 可以看到三个按钮添加到了AlertDialog上,三个没有添加事件处理的按钮,点了只是关闭对话框,没有任何其他操作。三、类似ListView的AlertDialog用setItems(CharSequence[] items, final OnClickListener listener)方法来实现类似ListView的AlertDialog第一个参数是要显示的数据的数组,第二个参数是点击某个item的触发事件[java] package com.tianjf;import android.app.Activity;import android.app.AlertDialog;import android.app.Dialog;import android.content.DialogInterface;import android.os.Bundle;import android.widget.Toast;public class Dialog_AlertDialogDemoActivity extends Activity { /** Called when the activity is first created. */ @Override public void onCreate(Bundle savedInstanceState) { super.onCreate(savedInstanceState); setContentView(R.layout.main); final String[] arrayFruit = new String[] { "苹果", "橘子", "草莓", "香蕉" }; Dialog alertDialog = new AlertDialog.Builder(this). setTitle("你喜欢吃哪种水果?"). setIcon(R.drawable.ic_launcher) .setItems(arrayFruit, new DialogInterface.OnClickListener() { @Override public void onClick(DialogInterface dialog, int which) { Toast.makeText(Dialog_AlertDialogDemoActivity.this, arrayFruit[which], Toast.LENGTH_SHORT).show(); } }). setNegativeButton("取消", new DialogInterface.OnClickListener() { @Override public void onClick(DialogInterface dialog, int which) { // TODO Auto-generated method stub } }). create(); alertDialog.show(); }}package com.tianjf;import android.app.Activity;import android.app.AlertDialog;import android.app.Dialog;import android.content.DialogInterface;import android.os.Bundle;import android.widget.Toast;public class Dialog_AlertDialogDemoActivity extends Activity {/** Called when the activity is first created. */@Overridepublic void onCreate(Bundle savedInstanceState) {super.onCreate(savedInstanceState);setContentView(R.layout.main);final String[] arrayFruit = new String[] { "苹果", "橘子", "草莓", "香蕉" };Dialog alertDialog = new AlertDialog.Builder(this).setTitle("你喜欢吃哪种水果?").setIcon(R.drawable.ic_launcher).setItems(arrayFruit, new DialogInterface.OnClickListener() {@Overridepublic void onClick(DialogInterface dialog, int which) {Toast.makeText(Dialog_AlertDialogDemoActivity.this, arrayFruit[which], Toast.LENGTH_SHORT).show();}}).setNegativeButton("取消", new DialogInterface.OnClickListener() {@Overridepublic void onClick(DialogInterface dialog, int which) {// TODO Auto-generated method stub}}).create();alertDialog.show();}}运行结果如下:
 四、类似RadioButton的AlertDialog用setSingleChoiceItems(CharSequence[] items, int checkedItem, final OnClickListener listener)方法来实现类似RadioButton的AlertDialog第一个参数是要显示的数据的数组,第二个参数是初始值(初始被选中的item),第三个参数是点击某个item的触发事件在这个例子里面我们设了一个selectedFruitIndex用来记住选中的item的index[java] package com.tianjf;import android.app.Activity;import android.app.AlertDialog;import android.app.Dialog;import android.content.DialogInterface;import android.os.Bundle;import android.widget.Toast;public class Dialog_AlertDialogDemoActivity extends Activity { private int selectedFruitIndex = 0; /** Called when the activity is first created. */ @Override public void onCreate(Bundle savedInstanceState) { super.onCreate(savedInstanceState); setContentView(R.layout.main); final String[] arrayFruit = new String[] { "苹果", "橘子", "草莓", "香蕉" }; Dialog alertDialog = new AlertDialog.Builder(this). setTitle("你喜欢吃哪种水果?"). setIcon(R.drawable.ic_launcher) .setSingleChoiceItems(arrayFruit, 0, new DialogInterface.OnClickListener() { @Override public void onClick(DialogInterface dialog, int which) { selectedFruitIndex = which; } }). setPositiveButton("确认", new DialogInterface.OnClickListener() { @Override public void onClick(DialogInterface dialog, int which) { Toast.makeText(Dialog_AlertDialogDemoActivity.this, arrayFruit[selectedFruitIndex], Toast.LENGTH_SHORT).show(); } }). setNegativeButton("取消", new DialogInterface.OnClickListener() { @Override public void onClick(DialogInterface dialog, int which) { // TODO Auto-generated method stub } }). create(); alertDialog.show(); }}package com.tianjf;import android.app.Activity;import android.app.AlertDialog;import android.app.Dialog;import android.content.DialogInterface;import android.os.Bundle;import android.widget.Toast;public class Dialog_AlertDialogDemoActivity extends Activity {private int selectedFruitIndex = 0;/** Called when the activity is first created. */@Overridepublic void onCreate(Bundle savedInstanceState) {super.onCreate(savedInstanceState);setContentView(R.layout.main);final String[] arrayFruit = new String[] { "苹果", "橘子", "草莓", "香蕉" };Dialog alertDialog = new AlertDialog.Builder(this).setTitle("你喜欢吃哪种水果?").setIcon(R.drawable.ic_launcher).setSingleChoiceItems(arrayFruit, 0, new DialogInterface.OnClickListener() {@Overridepublic void onClick(DialogInterface dialog, int which) {selectedFruitIndex = which;}}).setPositiveButton("确认", new DialogInterface.OnClickListener() {@Overridepublic void onClick(DialogInterface dialog, int which) {Toast.makeText(Dialog_AlertDialogDemoActivity.this, arrayFruit[selectedFruitIndex], Toast.LENGTH_SHORT).show();}}).setNegativeButton("取消", new DialogInterface.OnClickListener() {@Overridepublic void onClick(DialogInterface dialog, int which) {// TODO Auto-generated method stub}}).create();alertDialog.show();}}运行结果如下:
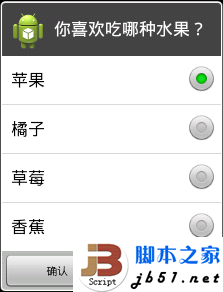 五、类似CheckBox的AlertDialog用setMultiChoiceItems(CharSequence[] items, boolean[] checkedItems, final OnMultiChoiceClickListener listener)方法来实现类似CheckBox的AlertDialog第一个参数是要显示的数据的数组,第二个参数是选中状态的数组,第三个参数是点击某个item的触发事件[java] package com.tianjf;import android.app.Activity;import android.app.AlertDialog;import android.app.Dialog;import android.content.DialogInterface;import android.os.Bundle;import android.widget.Toast;public class Dialog_AlertDialogDemoActivity extends Activity { /** Called when the activity is first created. */ @Override public void onCreate(Bundle savedInstanceState) { super.onCreate(savedInstanceState); setContentView(R.layout.main); final String[] arrayFruit = new String[] { "苹果", "橘子", "草莓", "香蕉" }; final boolean[] arrayFruitSelected = new boolean[] {true, true, false, false}; Dialog alertDialog = new AlertDialog.Builder(this). setTitle("你喜欢吃哪种水果?"). setIcon(R.drawable.ic_launcher) .setMultiChoiceItems(arrayFruit, arrayFruitSelected, new DialogInterface.OnMultiChoiceClickListener() { @Override public void onClick(DialogInterface dialog, int which, boolean isChecked) { arrayFruitSelected[which] = isChecked; } }). setPositiveButton("确认", new DialogInterface.OnClickListener() { @Override public void onClick(DialogInterface dialog, int which) { StringBuilder stringBuilder = new StringBuilder(); for (int i = 0; i < arrayFruitSelected.length; i++) { if (arrayFruitSelected[i] == true) { stringBuilder.append(arrayFruit[i] + "、"); } } Toast.makeText(Dialog_AlertDialogDemoActivity.this, stringBuilder.toString(), Toast.LENGTH_SHORT).show(); } }). setNegativeButton("取消", new DialogInterface.OnClickListener() { @Override public void onClick(DialogInterface dialog, int which) { // TODO Auto-generated method stub } }). create(); alertDialog.show(); }}package com.tianjf;import android.app.Activity;import android.app.AlertDialog;import android.app.Dialog;import android.content.DialogInterface;import android.os.Bundle;import android.widget.Toast;public class Dialog_AlertDialogDemoActivity extends Activity {/** Called when the activity is first created. */@Overridepublic void onCreate(Bundle savedInstanceState) {super.onCreate(savedInstanceState);setContentView(R.layout.main);final String[] arrayFruit = new String[] { "苹果", "橘子", "草莓", "香蕉" };final boolean[] arrayFruitSelected = new boolean[] {true, true, false, false};Dialog alertDialog = new AlertDialog.Builder(this).setTitle("你喜欢吃哪种水果?").setIcon(R.drawable.ic_launcher).setMultiChoiceItems(arrayFruit, arrayFruitSelected, new DialogInterface.OnMultiChoiceClickListener() {@Overridepublic void onClick(DialogInterface dialog, int which, boolean isChecked) {arrayFruitSelected[which] = isChecked;}}).setPositiveButton("确认", new DialogInterface.OnClickListener() {@Overridepublic void onClick(DialogInterface dialog, int which) {StringBuilder stringBuilder = new StringBuilder();for (int i = 0; i < arrayFruitSelected.length; i++) {if (arrayFruitSelected[i] == true){stringBuilder.append(arrayFruit[i] + "、");}}Toast.makeText(Dialog_AlertDialogDemoActivity.this, stringBuilder.toString(), Toast.LENGTH_SHORT).show();}}).setNegativeButton("取消", new DialogInterface.OnClickListener() {@Overridepublic void onClick(DialogInterface dialog, int which) {// TODO Auto-generated method stub}}).create();alertDialog.show();}}运行结果如下:
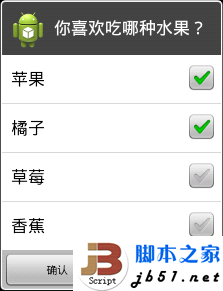 六、自定义View的AlertDialog有时候我们不能满足系统自带的AlertDialog风格,就比如说我们要实现一个Login画面,有用户名和密码,这时我们就要用到自定义View的AlertDialog先创建Login画面的布局文件[html] <?xml version="1.0" encoding="utf-8"?><LinearLayout xmlns:android="http://schemas.android.com/apk/res/android" android:layout_width="fill_parent" android:layout_height="fill_parent" android:orientation="vertical" > <LinearLayout android:layout_width="fill_parent" android:layout_height="wrap_content" android:gravity="center" > <TextView android:layout_width="0dip" android:layout_height="wrap_content" android:layout_weight="1" android:text="@string/user" /> <EditText android:layout_width="0dip" android:layout_height="wrap_content" android:layout_weight="1" /> </LinearLayout> <LinearLayout android:layout_width="fill_parent" android:layout_height="wrap_content" android:gravity="center" > <TextView android:layout_width="0dip" android:layout_height="wrap_content" android:layout_weight="1" android:text="@string/passward" /> <EditText android:layout_width="0dip" android:layout_height="wrap_content" android:layout_weight="1" /> </LinearLayout></LinearLayout><?xml version="1.0" encoding="utf-8"?><LinearLayout xmlns:android="http://schemas.android.com/apk/res/android" android:layout_width="fill_parent" android:layout_height="fill_parent" android:orientation="vertical" > <LinearLayout android:layout_width="fill_parent" android:layout_height="wrap_content" android:gravity="center" > <TextView android:layout_width="0dip" android:layout_height="wrap_content" android:layout_weight="1" android:text="@string/user" /> <EditText android:layout_width="0dip" android:layout_height="wrap_content" android:layout_weight="1" /> </LinearLayout> <LinearLayout android:layout_width="fill_parent" android:layout_height="wrap_content" android:gravity="center" > <TextView android:layout_width="0dip" android:layout_height="wrap_content" android:layout_weight="1" android:text="@string/passward" /> <EditText android:layout_width="0dip" android:layout_height="wrap_content" android:layout_weight="1" /> </LinearLayout></LinearLayout>然后在Activity里面把Login画面的布局文件添加到AlertDialog上[java] package com.tianjf;import android.app.Activity;import android.app.AlertDialog;import android.app.Dialog;import android.content.DialogInterface;import android.os.Bundle;import android.view.LayoutInflater;import android.view.View;public class Dialog_AlertDialogDemoActivity extends Activity { /** Called when the activity is first created. */ @Override public void onCreate(Bundle savedInstanceState) { super.onCreate(savedInstanceState); setContentView(R.layout.main); // 取得自定义View LayoutInflater layoutInflater = LayoutInflater.from(this); View myLoginView = layoutInflater.inflate(R.layout.login, null); Dialog alertDialog = new AlertDialog.Builder(this). setTitle("用户登录"). setIcon(R.drawable.ic_launcher). setView(myLoginView). setPositiveButton("登录", new DialogInterface.OnClickListener() { @Override public void onClick(DialogInterface dialog, int which) { // TODO Auto-generated method stub } }). setNegativeButton("取消", new DialogInterface.OnClickListener() { @Override public void onClick(DialogInterface dialog, int which) { // TODO Auto-generated method stub } }). create(); alertDialog.show(); }}package com.tianjf;import android.app.Activity;import android.app.AlertDialog;import android.app.Dialog;import android.content.DialogInterface;import android.os.Bundle;import android.view.LayoutInflater;import android.view.View;public class Dialog_AlertDialogDemoActivity extends Activity {/** Called when the activity is first created. */@Overridepublic void onCreate(Bundle savedInstanceState) {super.onCreate(savedInstanceState);setContentView(R.layout.main);// 取得自定义ViewLayoutInflater layoutInflater = LayoutInflater.from(this);View myLoginView = layoutInflater.inflate(R.layout.login, null);Dialog alertDialog = new AlertDialog.Builder(this).setTitle("用户登录").setIcon(R.drawable.ic_launcher).setView(myLoginView).setPositiveButton("登录", new DialogInterface.OnClickListener() {@Overridepublic void onClick(DialogInterface dialog, int which) {// TODO Auto-generated method stub}}).setNegativeButton("取消", new DialogInterface.OnClickListener() {@Overridepublic void onClick(DialogInterface dialog, int which) {// TODO Auto-generated method stub}}).create();alertDialog.show();}}运行结果如下:
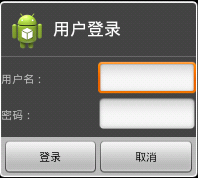 摘自 殇雲的专栏


