目录
- 下载
- 上传
- 总结
下载
更新配制文件,添加如下字段,这里用alias实现把嵌入式开发板的根目录全部映射过去,
location /download {
alias /;
autoindex on;
autoindex_localtime on;
autoindex_exact_size off;
}
执行,
$ ./nginx/sbin/nginx -p ./nginx -s reload
上传
需要有nginx的源码,重新编译nginx,添加上传模块,上传进度模块,
$ ./configure –add-module=$parent_path/nginx-upload-module-2.3.0 –add-module=$parent_path/nginx-upload-progress-module-0.8.4
$ make
$ make install
注意上传进度模块,到0.9版本有一个不兼容的更改,
in version 0.9.0 there is INCOMPATIBLE CHANGE: JSONP is now the default output of the progress probes. If you rely on this module serving the deprecated java output use:
upload_progress_java_output
in the progress probe location.
添加配置文件,
location /upload {
upload_pass /;
# upload_cleanup 400 404 499 500-505;
upload_store /boot;
upload_store_access user:rw;
# upload_limit_rate 128k;
upload_set_form_field \”${upload_field_name}_name\” $upload_file_name;
upload_set_form_field \”${upload_field_name}_content_type\” $upload_content_type;
upload_set_form_field \”${upload_field_name}_path\” $upload_tmp_path;
upload_aggregate_form_field \”${upload_field_name}_md5\” $upload_file_md5;
upload_aggregate_form_field \”${upload_field_name}_size\” $upload_file_size;
upload_pass_form_field \”^.*$\”;
}
建立html测试,使用fcgi,
printf(\”<form method=\\\”POST\\\” enctype=\\\”multipart/form-data\\\” action=\\\”uploademmc\\\”\\n\”);
printf(\”<p>File Upload:\\n\”);
printf(\”<input type=\\\”file\\\” name=\\\”file\\\” value=\\\”\\\”>\\n\”);
printf(\”<p>\\n\”);
printf(\”<input type=\\\”submit\\\” name=\\\”uploademmc\\\” value=\\\”uploademmc\\\”>\\n\”);
printf(\”<p>\\n\”);
printf(\”</form>\\n\”);
上传,0000000001即为新上传的文件,这里必须用脚本在上传结束后来执行重命名操作,
root@zynqmp:~# ls -l /boot
total 53172
-rw——- 1 root root 31428 Jan 26 16:11 0000000001
-rw-r–r– 1 root root 14283264 Jan 26 12:06 Image
-rwxr-xr-x 1 root root 19311212 Jan 1 1970 MWM178_V1_U6_V1.bit
-rw-r–r– 1 root root 1118392 Jan 26 06:47 boot.bin
-rw-r–r– 1 root root 19634147 Jan 26 00:56 rootfs.ext4.gz.uboot
-rw-r–r– 1 root root 29091 Jan 26 06:47 system.dtb
上传使用post方法,后端接收到的字符串为如下格式,可以看到文件名在file_name字段中,可利用环境变量REQUEST_URI提取出来即可,
——WebKitFormBoundarygKAThjQRpvOwowzR
Content-Disposition: form-data; name=\”file_name\”
11.PNG
——WebKitFormBoundarygKAThjQRpvOwowzR
Content-Disposition: form-data; name=\”file_content_type\”
image/png
——WebKitFormBoundarygKAThjQRpvOwowzR
Content-Disposition: form-data; name=\”file_path\”
/boot/0023791667
——WebKitFormBoundarygKAThjQRpvOwowzR
Content-Disposition: form-data; name=\”file_md5\”
0276e88e6161ac806d46ee0afb45976e
——WebKitFormBoundarygKAThjQRpvOwowzR
Content-Disposition: form-data; name=\”file_size\”
17734
——WebKitFormBoundarygKAThjQRpvOwowzR
Content-Disposition: form-data; name=\”uploademmc\”
uploademmc
——WebKitFormBoundarygKAThjQRpvOwowzR–
FCGI_ROLE=RESPONDER
SCRIPT_FILENAME=./nginx/html/index.cgi
QUERY_STRING=
REQUEST_METHOD=POST
CONTENT_TYPE=multipart/form-data; boundary=—-WebKitFormBoundarygKAThjQRpvOwowzR
CONTENT_LENGTH=706
SCRIPT_NAME=/index.cgi
REQUEST_URI=/uploademmc
上传进度模块需要前端js协助,配置文件,前面提到的0.9版本有一个不兼容的更改,如果需要和老版本兼容,需要在location ^~ /progress中添加upload_progress_java_output,
http {
…
upload_progress proxied 5m;
server {
…
location = / {
fastcgi_pass 127.0.0.1:8088;
fastcgi_index index.cgi;
include fastcgi.conf;
}
location /download {
alias /;
autoindex on;
autoindex_localtime on;
autoindex_exact_size off;
}
location /upload {
upload_pass /;
# upload_cleanup 400 404 499 500-505;
upload_store /boot;
upload_store_access user:rw;
# upload_limit_rate 128k;
client_max_body_size 8g;
upload_set_form_field \”${upload_field_name}_name\” $upload_file_name;
upload_set_form_field \”${upload_field_name}_content_type\” $upload_content_type;
upload_set_form_field \”${upload_field_name}_path\” $upload_tmp_path;
upload_aggregate_form_field \”${upload_field_name}_md5\” $upload_file_md5;
upload_aggregate_form_field \”${upload_field_name}_size\” $upload_file_size;
upload_pass_form_field \”^.*$\”;
track_uploads proxied 30s;
}
location ^~ /progress {
# report uploads tracked in the \’proxied\’ zone
report_uploads proxied;
# upload_progress_java_output;
}
location ~ \\.js$ {
root html;
}
设置参数client_max_body_size 8g,否则上传时会报错413 Request Entity Too Large,编写html,
printf(\”<form id=\\\”upload\\\” method=\\\”POST\\\” enctype=\\\”multipart/form-data\\\” action=\\\”upload\\\” οnsubmit=\\\”openProgressBar(); return true;\\\”\\n\”);
printf(\”<p>File Upload:\\n\”);
printf(\”<input type=\\\”file\\\” name=\\\”file\\\” value=\\\”\\\”>\\n\”);
printf(\”<p>\\n\”);
printf(\”<input type=\\\”submit\\\” name=\\\”upload\\\” value=\\\”upload\\\”>\\n\”);
printf(\”<p>\\n\”);
printf(\”</form>\\n\”);
printf(\”<div>\\n\”);
printf(\”<div id=\\\”progress\\\” style=\\\”width: 400px; border: 1px solid black\\\”>\\n\”);
printf(\”<div id=\\\”progressbar\\\” style=\\\”width: 1px; background-color: blue; border: 1px solid white\\\”> </div>\\n\”);
printf(\”</div>\\n\”);
printf(\”<div id=\\\”tp\\\”>(progress)</div>\\n\”);
printf(\”</div>\\n\”);
添加js文件,
interval = null;
function openProgressBar() {
/* generate random progress-id */
uuid = \”\”;
for (i = 0; i < 32; i++) {
uuid += Math.floor(Math.random() * 16).toString(16);
}
/* patch the form-action tag to include the progress-id */
document.getElementById(\”upload\”).action=\”/upload?X-Progress-ID=\” + uuid;
/* call the progress-updater every 1000ms */
interval = window.setInterval(
function () {
fetch(uuid);
},
1000
);
}
function fetch(uuid) {
req = new XMLHttpRequest();
req.open(\”GET\”, \”/progress\”, 1);
req.setRequestHeader(\”X-Progress-ID\”, uuid);
req.onreadystatechange = function () {
if (req.readyState == 4) {
if (req.status == 200) {
/* poor-man JSON parser */
var upload = eval(req.responseText);
document.getElementById(\’tp\’).innerHTML = upload.state;
/* change the width if the inner progress-bar */
if (upload.state == \’done\’ || upload.state == \’uploading\’) {
bar = document.getElementById(\’progressbar\’);
w = 400 * upload.received / upload.size;
bar.style.width = w + \’px\’;
}
/* we are done, stop the interval */
if (upload.state == \’done\’) {
window.clearTimeout(interval);
}
}
}
}
req.send(null);
}
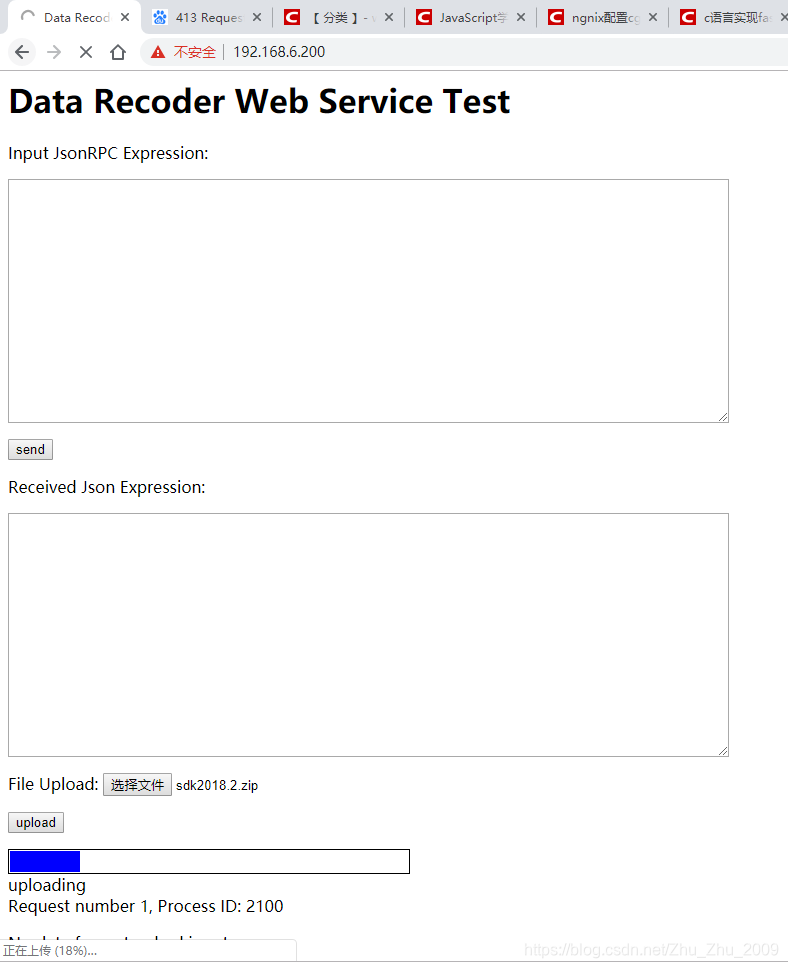
测试一下,chrome自己也会统计上传进度,标题栏开始小圆圈刷新,
总结
以上就是nginx服务器实现上传下载文件的实例代码的详细内容,更多关于nginx上传下载文件的资料请关注悠久资源其它相关文章!